Wednesday, April 20, 2011
Blog Break and Help Needed
I also am in the process of starting a new business venture and am in desperate need of some volunteers who would be willing to give me feedback. I am needing people who have had a baby within the last 3 months or are excepting a within the next couple of months. Every month you would receive a gift basket for your growing baby for their first year of life and all I need in return is for my volunteers to fill out a short survey every 3 months. If anyone would be willing to participate please either leave a comment where I can email you at or just send me an email.
Thank you for your support and understanding. See you in May.
Monday, April 18, 2011
Chips ACount Cookies
I have mentioned these cookies in passing and I sell them in my Etsy shop but recently my friend Len over at Crafty Homeschool did a little post on them and took some great pictures and I wanted to share. I made two sets of these cookies for Christmas I made them for my nephew and for her daughter, and they were a hit.
I know that felt cookies are nothing new but I think that my batch puts a new twist on felt cookies. These are numbered and can be played with for many different purposes. Pretend play and as the child grows they can learn their numbers, and even as they get older they can learn basic math by adding and subtracting.
I designed them to slightly resemble a bag of Chips Ahoy cookies, and the bag velcro’s closed so that the cookies won’t fall out. Be sure to check out Len’s post found HERE for additional images and how well they hold up.
I will be linking this to:

Wednesday, April 13, 2011
Guest Post From Crafty Homeschool
Now let me tell you a little bit about my relationship with Len she truly is my only friend. If I'm having a crisis no matter what time, day or night, she is the person I can call, I say call because she lives about 4 hours away from me, we don't get to see each other very often, but even with only being able to communicate over the phone we still consider each other BF'S. Now as awesome of all that is she is seriously talented and I hope to have 1/2 of her talent someday, I also hope that someday I will get one of the rice packs that she has talked about for years (HINT: I have a birthday coming up), seriously I've been asking for one for about 2 years now. Just look at this cute purse she made for a birthday present.
And I love this outfit she made for her youngest daughter
Now the coolest project yet has to be this project below, I am so grateful that she was willing throw something together for so off to an extremely talented mother, crafter, wife, best friend, and teacher.
Hello my name is Len and my creative space in blog land is called Crafty Homeschool. I am a homeschooling mother of three very wild kidos ages 2, 5, and 7. I was so excited when my BF Athena asked me to do a guest post for her.
I was on Moms of all Trades and she made a rock mat for her husband’s work boots. It gave me an idea to bring a little beach indoors. Beaches are very calming to me and are fun, both of which I think my house could use a little more of. I wanted to make a welcome mat but the epoxy for outdoor use was $55 (a little out of my budget). Then I thought about making a bath mat but I like my really plush bath mat. I finally decided on a mat to go in front of the shoe bench in my entryway (ok I don’t have one yet, someday, a girl can dream right). Imagine with me for a minute this lovely bench/kid organizer in my entry with my beach mat right in front of it. Lovely, don’t you think?
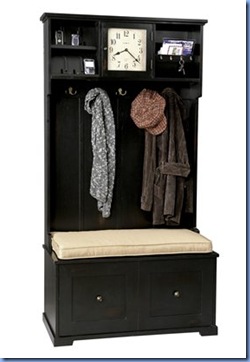
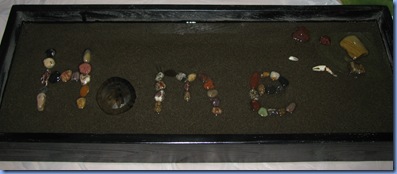
Sorry the picture is a little dark (lack of lighting). Ok, here is how you make the beach mat.
Items you will need:
-Board. Mine was 3/4” plywood that was cut to 10”x32” (long and skinny).
-Sandpaper
-Primer and paint (I used spray on primer and spray paint, much easier)
-Two part epoxy ( it’s spendy but worth the price, order it online, it’s cheaper) KEEP KIDS AWAY and you may want to do it outdoors (smelly for a couple of days) and leave it in a box to keep dirt out until it’s dry. Also make sure you get enough to cover the entire project (should say sq ft covered).
-Rocks and sand (we took a trip to the river and made a day of playing and gathering sand/rocks, the kids didn’t mind one bit)
-Molding or whatever you want your trim to be
-Caulk (any kind) If you don’t have a gun they do make it in a squeeze tube.
-Scrap felt or fleece for feet (so your floors don’t get scratched) and glue (I used hot glue).
How to:
#1- Cut molding/trim to the correct size to go along the outside of your plywood.
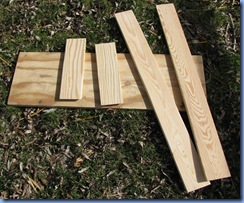
#2- Sand the plywood
#3- Make your “box”. Install the molding around the outside of your plywood sheet making sure that you leave a lip on the top. (If you have paintable caulk then you can do step #6 also)
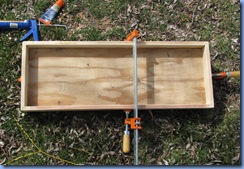
#4- Prime and paint the entire box, let dry. (I had paintable caulk)
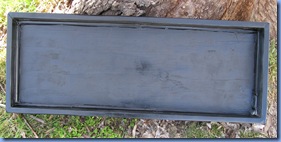
#5-Flip over the box and hot glue the “feet” onto the bottom, not necessary if it will be on carpet.
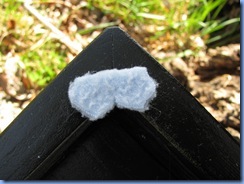
#6- Caulk around the inside of your box, it doesn’t have to look nice it’s just to keep the sand and epoxy from ending up everywhere. Let it dry.
#7- Pour in sand to the desired level.
#8- Arrange your rocks in the box (fun for kids to do)
#9- Mix the epoxy (read the directions carefully and follow them exactly). Make sure the floor is protected (just in case). Pour epoxy over the entire thing, SLOWLY.
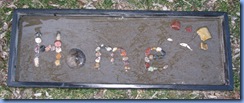
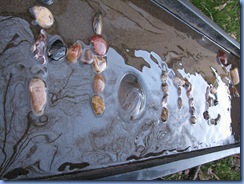
#10- Let it sit the specified time, wipe off extra sand dust. Now stand back and admire your indoor beach.
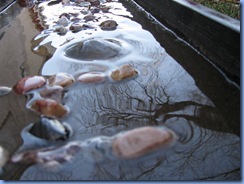
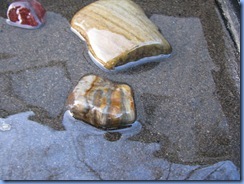
Monday, April 11, 2011
Craft Room Wall Tiles
I have wanted to do this project for quite sometime, I have been saving up supplies and thanks to the One Month Two Win It competition I sat down and finished it, despite not winning this is one of my favorite pieces that I have ever created and even better it is something that I made for me, quite a rare treat. I am completely rewriting this post from what I wrote on the competition and posting better pictures, the reason being because when writing the post for the competition I was focusing on staying completely anonymous, and it totally sucked. My original inspiration for this project came from Pottery Barn Teen with this image.
Trying to start a business I want to make sure that I have everything accessible in one place and upon seeing this I knew that I could make it work for my needs. Being that it was for my needs and that I am not a teenager I wanted to give it a more grown up look and I think I achieved it, with a special thanks to The Graphic’s Fairy.
The first thing I did was I started shopping around for the supplies, I wanted to be able to make this project for fairly cheap, and the total cost can easily be replicated for under $30. I found four cork board tiles on sale at Fred Meyer for $5, I bought them and based everything on the dimension of those tiles, which thankfully were 1-foot by 1-foot.
I had purchased some off-white canvas, for another project (that I won’t be doing), and cut it so that I could cover the corkboard with it, being that the project was wall art I wanted to print an image on it, enter The Graphic Fairy. The problem: these fabric pieces were right around 14 inches wide and my printer will only print 8.5 inches wide. I really didn’t want to use t-shirt transfer, I know it is a fine alternative but I didn’t want that glossy look on my fabric. So with A LOT of pressing I was able to fold down the fabric to fit into my printer onto fabric paper, it was a bit thick but once it took the fabric my printer had NO PROBLEM printing on it. I didn’t know what option to do, and I still don’t think I prefer one over the other, so for two tiles I just stapled the fabric on using a regular stapler and on the other two tiles I hot glued them, both optioned worked fine.
I had my four cork board tiles I knew that I wanted to do nine tiles, I wanted two that were magnetic chalkboards, I knew that I wanted a clock, and I knew that I wanted a dry erase board but I really didn’t want it white. I went to the craft store and found this scrapbook paper, I knew that it would fit beautifully within the other images. I purchased that and some clear plastic that was meant to cover a calendar. I sort of had eight of my tiles planned out. So the next step was to drive the 65 miles to my parents house and have my dad help me out with the logistics of it all, when I showed him what I had and my drawing he quickly wrote down P-P-P-P-P-P-P, Oh yes, Prior Proper Planning Prevents Piss Poor Production. We sat down and talked and decided that the best option would be to buy some velcro and a white board to hang and mount with, we each had our shopping lists and decided that we would meet back up the following weekend, THE WEEKEND THAT MY PROJECT WAS DO, talk about no time to screw up.
I had issues with finding a cheap metal for my tiles, I had some decorative metal signs that I have never hung up that I was debating parting with, but luckily my dad found something that fit into my budget he found a flat galvanized stove pipe. I cut it down to size by just using some gardening clippers, easy peasy. Wanting to have the tiles all be the same thickness I glued the metal onto some of the white board that I cut down using construction adhesive, I then went outside on the cold, snowy mountain and spray painted them with chalkboard paint.
I took another piece of the white board spray painted it periwinkle blue and then took some more images from The Graphic’s Fairy that I had printed on paper and mod podged them on, this tile was for my clock. I wanted it nice and glossy so I went over it several times.
I took another piece of the white board and Mod Podged the scrapbook paper onto it, I didn’t know how I was going to attach the plastic over it, I finally decided on just super gluing the edges on, the problem with this is that it did stain my paper a bit, it looks a bit water damaged, had I have known it was going to do that I would have just glued it all over and gone for a nice vintage water damaged look, it still works though.
All the tiles are done now I just had to frame them. Again, wanting to keep this project cheap I bought some cheap press board molding, it was also light weight which meant that it wouldn’t be that heavy putting it up on the wall, living in an apartment I wanted to make sure that I didn’t damage my wall. I cut each piece of molding 36-1/4 inches, and remember when I said that I had no time for error, whoops, cut one piece of molding upside down and didn’t have enough extra. Enter my AWESOME DAD he drove the 65 miles north and purchased another piece of molding and drove it back down, while he did this I glued down the 3 sides of molding onto the remaining white board using some more of the construction adhesive and finished the remaining tiles. Once he got back cut the last piece of molding, properly and glued that on. I let it set for a bit removed the clamps and spray painted it with some almond spray paint I covered it a few times and then went to bed.
The next morning everything was completely dry and I started placing my tiles in it, the almond spray paint was YUCK, it was just too matchy-matchy so I took some black acrylic paint brushed is on and it gave it a nice aged look.
I drilled a hole in the middle of the clock tile and set up the clock mechanism placed it where I wanted and then cut out a hole in the back of the whiteboard for the clock mechanism. Every back of the tile had two pieces of velcro on it and that is how they are attached to the frame. It is nice because I can easily switch out the tiles and it makes life a lot easier when the time comes to change the battery out on the clock.
Despite being a LOSER I really do love this piece.
Friday, April 8, 2011
Friday I’m In Love
So did you notice? Did ya? Go ahead go on over to One Month Two Win It, scroll all the way to the bottom, yep that’s right I’m a LOSER!
I must admit I’m a bit sad by the whole thing, a lot of different factors that I need to think about and it makes me wonder if I even have a chance with this creative lifestyle maybe I am not one of the people meant to knock off Pottery Barn. I will post a much better post on my AWESOME CRAFT AREA WALL ART on Monday and then on Wednesday, my real life friend, Len over at Crafty Homeschool will be guest posting! Needless to say I am having a difficult time with this weeks Friday I’m in Love so to start off let’s revisit the song that started it all.
So to start off with, so that I don’t sound like a COMPLETE sore loser, I am grateful that I had the opportunity to compete on One Month To Win It, it was fun and I know secrets still for the end of the month.
I also love the blog simply sadie jane the other day she posted this image of her toilet.
Yep, she totally taped her toilet seat down to teach her husband a lesson. I don’t have a man in the house so I don’t have the issue of falling in the seat but now I know how to set him straight! LOVE IT!!
My other blog that I am in love with is Life, Crafts, and Whatever what I love is that she says things like it is. If I comment on her post she always responds to me, I love bloggers who actually take the time for their followers and I must say whenever she responds to me I feel like a rock star is talking to me.
Hope you enjoy your weekend, I will try and restore my faith in crafting by next week.
Wednesday, April 6, 2011
Boy Version of Shirts for Japan
Just a reminder that today is the last day that you can vote for a project over at One Month To Win It, if you haven’t voted yet please be sure to vote remember I am a contestant and 50% of the vote comes for you. It would be nice if you would vote for my project but alas I can not tell you which one that is, so SAD.
As mentioned on Sunday’s post the girls and I made the Chloe and Mieko shirts for Japan. They told me how everyone kept complementing their shirts but it wasn’t until we went skating that night that I really saw the response they were getting on their shirts. Many people complemented them on their shirts and it was nice to hear the girls tell others what the shirts actually meant
We finished the boy versions of the shirts and they were a lot more difficult to make, not really more difficult but a lot more thread changes on the boys because of the hats as well. They turned out great and two of them are on there way to Utah for my cousins along with a nice note telling them about the shirts and the other two shirts are on there way to California where they will be packed into a suitcase and then flown to Japan.
Again we had just a great time making these shirts and I encourage all of you to make your own shirts, it was really rewarding. So make sure you got to Living with Punks and to Pink Fig Design so that you can get all of the questions that you may have about these shirts answered.


